Tuesday, May 17, 2011

You float my boat


Hi!

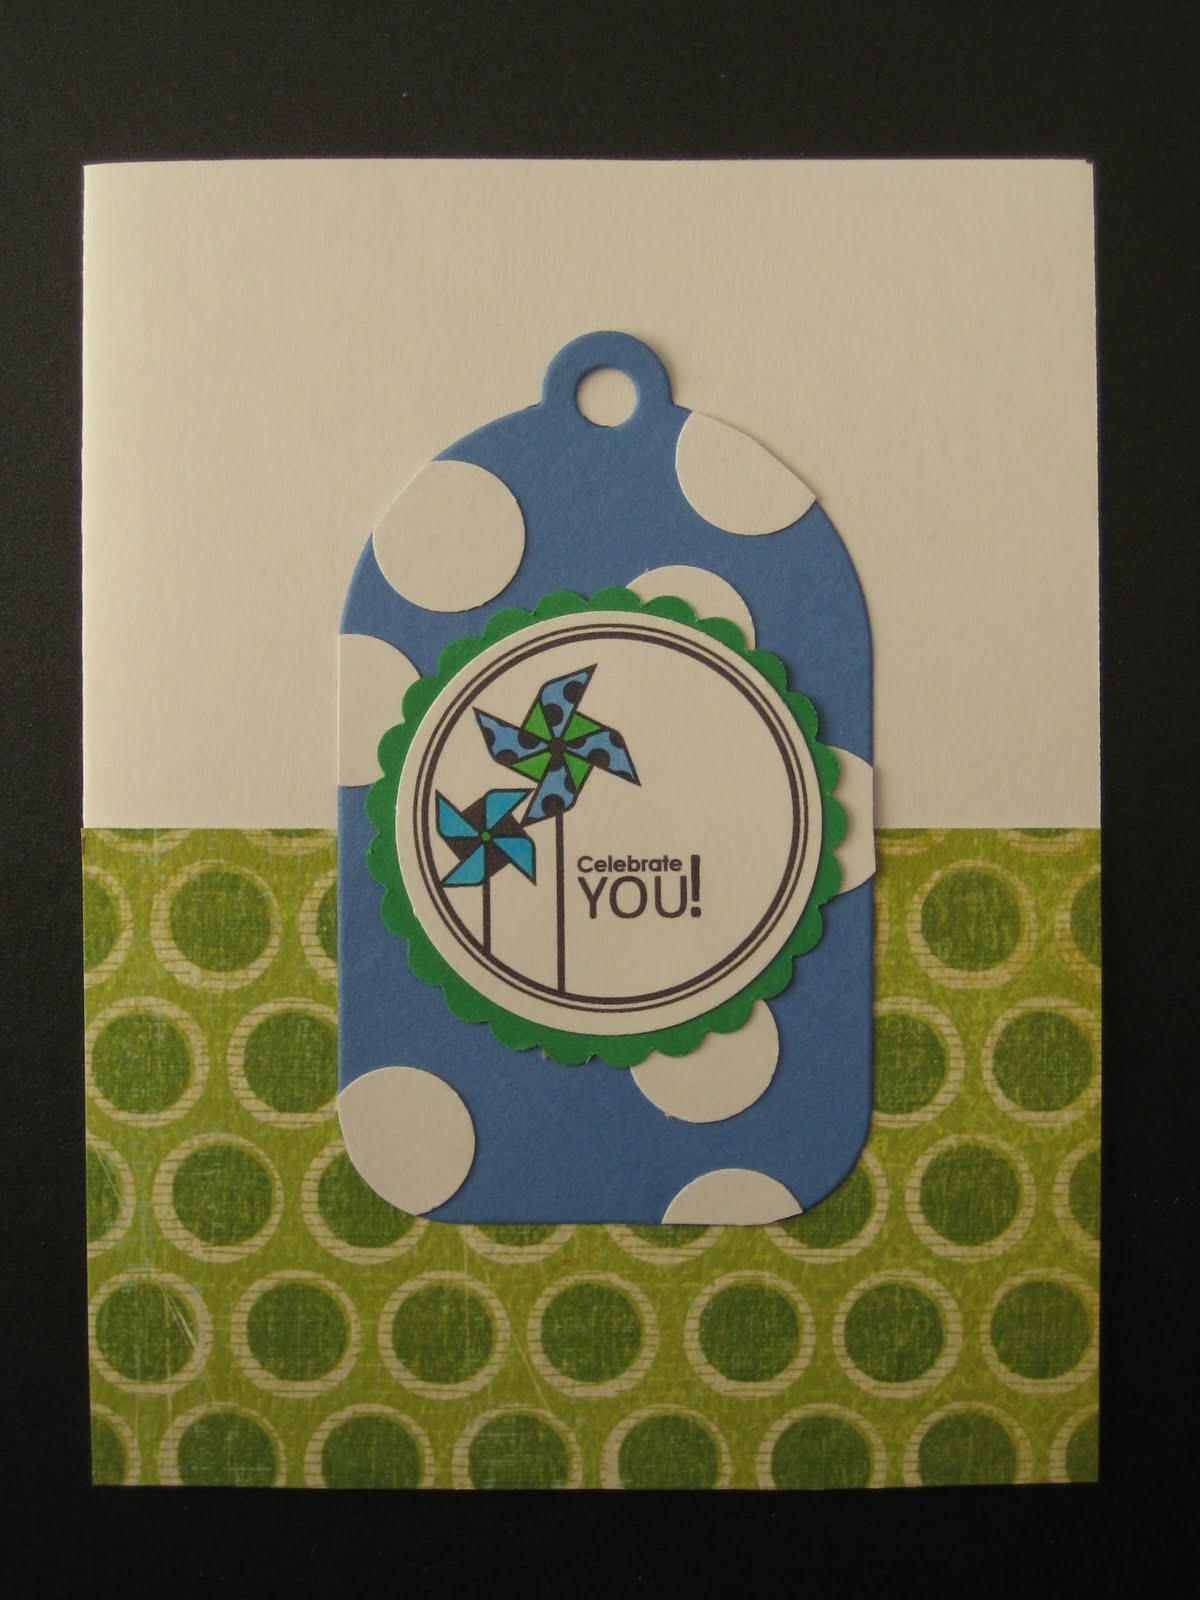
I made this card a few months back, but never had a chance to post it on the blog. When Nichole Heady introduced the newest set of Tiny Treats stamps, she showed a card using a very similar layout. I have always really liked the tiny treats stamp sets, but I never really knew how to use them successfully on a card. Yet, her card was perfect! Therefore, I immediately CASED her card, using the various tiny treats sets I had at home. This was one of the cards I made. Three sail boats are stamped on small white circles and then colored with Copic Markers. I stamped the blue Mat Stack #4 die cut with versa mark, to add a small pattern to the background. A light blue double ended banner was added behind the circles. A sentiment from Tiny Treats Valentine was added below the boats in PTI's white ink. Finally, a small 'I love you' sentiment was added at the bottom with a little heart. I hope you enjoy!

Saturday, May 14, 2011

Train Tracks


Hi everyone!

I know I haven't posted any cards in a little while. I just finished up my senior year in college and will be graduating next week. I made this card a few weeks ago, but did not get a chance to post it on the blog. I used PTI's new Train Tracks. I die cut the images, colored them with copics and placed them on the card. On the bottom is a piece of light blue gingham paper from Michael's Craft Store. I added a small happy birthday sentiment to go with the birthday presents on the train. Finally, I stamped the smoke image from the set, which really added that perfect finishing touch. I hope you enjoy!

Wednesday, April 27, 2011

Have a Great Day


Hey everyone!

Just wanted to share a quick card I made a few months back! I created this card soon after we got the PTI Way to Go Kiddo Stamp set. At first I wasn't very sure if we would get a lot of use about some of the images, but it has turned out to be a very fun and useful set to use to make cards for children. I created this card by stamping the various mushroom images in Versamark on green paper. I then cut the small white central focal point using a paper trimmer. I added the embellished edge using one of our edge punches from Fiskars. I stamped the image with the three smaller mushrooms on this white square and colored it with various green Copic markers. I stamped one of the sentiments from the set on the bottom and added two green gems to add a little something extra to the card. At this point, I placed the green piece on the card and was not completely satisfied with the look of the card. Something was missing. I found some rustic twine that we had lying around the house and added a piece on the bottom. Exactly what was missing! I loved how rustic the twine looked with the images of the mushrooms.

I hope you enjoy!

Monday, April 25, 2011

PTI April Blog Hop


Hi everyone! Welcome to the PTI blog hop. This month the theme was to make a masculine card, which was especially fun given that last month's release was all about masculine stamp sets. For this challenge, I decided to use the new Boy Basics Frog stamp set that Nichole introduced. I absolutely love this stamp! It is a larger version of a small stamp that is in the Tiny Treats Valentine stamp set. The set came with a matching lily pad and a fly, as well as two cute matching sentiments. I have to say that for this card I was truly inspired by one of the release projects Nichole Heady made with this adorable stamp set!

To create the background for this card, I stamped the new Boy Basics circles on a piece of green cardstock from Michaels. I used Versa Mark Ink and I really love how it came out. I then punched out a large white circle using a Marvy Punch. I die cut the frog and lilly pad on white paper and colored them in with Copic Markers. I stamped one of the matching sentiments from the set on the bottom of the circle. I then attached the lily pad directly to the white circle. I added the frog with a few pop up dots to give the card some dimension. I then added two small googly eyes to the frog. Finally, I stamped the image of the fly on the white circle. Before adhering the circle to the card front, I die cut a double ended banner die, which is also from PTI. I stamped this is green with the Gingham stamp set. I attached this strip to the card front, and then placed the central image on top.

I hope you enjoy!

PTI Blog Hop!


Welcome!!

It's that time again!!! PTI is having their April Blog Hop today.

This month's blog hop is dedicated to all the boys and men in our lives! Now's your chance to create Father's Day projects, boy birthday cards and more to build up your stash! Focus on masculine color schemes, fresh pattern combinations, understated embellishments and unique uses of images you may already have in your stash!

This was a great theme for the blog hop, as this past month's release was dedicated to all the men and boys in our lives. Although we got a bunch of new, more masculine stamp sets, the theme this month also pushed us to use our existing stamps in a more masculine way. This is exactly what Robin did with this fabulous card. Instead of coloring her favorite hot air balloons, she chose to paper piece them. I love the way they came out! She also popped the largest one with the thickest pop up dot and the middle one with a slightly thinner adhesive. The smallest balloon was adhered directly to the card. This gave the card an incredible amount of depth and it really looks as if the balloons are simply flying through the sky! I love it!!

Hope you enjoy!

Friday, April 15, 2011

OWH Blog Skip

Good morning! Welcome to the OWH Sticker Blog Skip!

(If you would like to start at the beginning of the skip, please go to the OWH Stars and Stamps Blog.)

Robin and I make a lot of cards for OWH using stickers, so we thought it would fun to showcase a few of them for everyone to see! In general, we prefer to use Paperhouse stickers, as they are amazingly realistic. Although they can be hard to find, they are worth looking for on your next trip to Michaels or A.C. Moore. We love the dog and cat stickers, as well as the butterflies and shells. In the summer, Robin also makes cards with the Paperhouse popsicles!

First is a fun card that Robin made! I love the fun patterned paper behind the dog stickers on this card. Each sticker is placed on a white square of cardstock. This was then placed on a pink piece of paper, which was placed on a darker pink strip. The paper used to back the stickers is embossed with tiny polka dots. Finally, a sentiment from Amuse Stamps finishes the card.


This next card is similar although the materials used are slightly different. The stickers are once again placed on a white square of cardstock. This was then placed on a square of brown cardstock, which was created using the Marvy punches. The same sentiment was used, although instead of backing it on patterned paper, Robin placed a small strip of Washi Tape across the bottom of the card. The tape not only looks great but is also very easy to move or reposition if necessary.


This card was created in a similar manner to the one above. I really like the butterfly stickers, especially for the spring. Once again, a piece of Washi Tape was placed on the bottom of the card.


In the summer, Robin generally makes cards using these popsicle stickers. These paperhouse stickers are so realistic! They really look like those summer treats we all enjoyed as kids. For this card, and the one below, she placed the stickers on a white square of paper and placed this on a colored piece of cardstock. She placed the squares on an angle to create the look of diamonds. Finally, a matching piece of Washi Tape on the bottom finishes off the card.


While I have always loved dogs, we got a cat when I was younger and we absolutely love her. Therefore, when we found cat stickers from Paperhouse, I immediately fell in love with them. The cats are so cute! I picked this card not only because of the stickers but also because of the awesome background paper used to complement the cats. The colors also go really well with the feline theme of the card. Finally, a thinking of you stamp was used to finish the card.


Finally, I though I would post two slightly different cards from those above. While Robin generally uses animal stickers from Paperhouse, we also really love their flowers. The flowers are larger than the above cats and dogs and once again look quite realistic. They have a wide variety of flowers at the craft store, but these are some of our favorites. The frames are punched with the Martha Stewart 'punch around the corner' double loop set. The paper behind the flowers is metallic paper from AC Crafts. I absolutely love this paper!


I hope this post showed everyone a few different ways to use stickers. If you haven't tried Paperhouse stickers before, I would encourage you to check them out the next time you are at your local craft store. You can also order them online at various stores.

Thanks so much for visiting!


The NEXT STOP on the blog skip is Paula at Handmade by Paula


Here is a list of the blogs participating in the blog skip:

Wednesday, March 23, 2011

Happy Birthday!


Hi!

I made this card a few months back after receiving a new birthday set from PTI. I die cut a Mat Stack #3 die in light pink paper. After die cutting the package and bow, I stamped them with the matching stamps. I love the polka dot birthday present that came with this set! I used a cuttle bug embossing folder to create the pattern on the background. The swiss dot impression folder creates such a fun background! I then used the double banner die from PTI to create the small white strip on the card. I stamped the sentiment from the matching birthday set in the same color purple (grape jelly momento ink). I finished the card with two light pink pearls. 

Hope you enjoy!

Sunday, March 20, 2011

Just a note...


Hi everyone!

Just thought I would post a quick card this morning! Robin made this card and I love how 'springy' it turned out! To make this card, Robin covered a white card base with a fun piece of patterned paper. I think the paper is one of the sheets from Scraptasia's going out of business sale! She then picked two matching colors of solid paper and punched out two layered circles using our Marvy punches. A sentiment stamped in black completes the card. Hope everyone is enjoying the spring weather!

Hope you enjoy!

Monday, March 14, 2011

Hi There


Good Afternoon-

I got the idea for this card after perusing Maile Bell's blog. I absolutely LOVE her work: she has such a CAS style! She often uses bold colors in a very modern way. In fact, if I ever feel as if I am running low on creativity, I tend to hop on over to either Maile's blog or Nichole Heady's blog. I can always count on both to inspire me!

For this card, I started with a piece of raspberry fizz PTI cardstock. I punched 6 white circles and stamped them with a small butterfly from PTI's Butterfly Dreams. I tried to alter the position of the butterflies on each circle. I used the Polka Dot Basic stamp set with VersaMark ink to create the polka dot background on the pink cardstock. I also used a small scallop edge punch to create the border. I attached the white circles to the pink base. The sentiment comes from a HeroArts stamp set. Finally, a few small pearls were used to accent the center of three of the butterflies. I hope you enjoy!

Thursday, March 10, 2011

Pawsing... to say hi!


Hey everyone!


Another older card today! We are still making plenty of new cards everyday but I thought I would share another card I found while looking through some old pictures. The next post will definitely have some new cards (we got a big order from PTI for the Feb. release - so there is soooo much to put up on the blog!) Anyway, this is a VERY old card that I made. It was certainly before we had discovered PTI or even Stampin' Up. I don't even think we had our Marvy Punches yet! The stamp comes from Michael's. I colored the stamp with pencils and backed it on two different brown rectangles. This was mounted on a small piece of yellow paper from a MatStack collection. Finally, a typed sentiment finishes off the card. I think it would be a great challenge to make another card with this stamp given all of the other materials we now have! The puppy is just so cute! Hope you enjoy!

Sunday, March 6, 2011

Something Old


Good Morning-

Sometimes I find myself sifting through photos of old cards we have made in the past two years. Its so funny how inspired you can be from your own work. iphoto stores the card photos in the order in which they were updated. I admit that we have come a long way; those early cards were made with very few materials and very basic techniques.

This is one of those old cards that I found. I believe I made this card last spring. I have always loved the combination of brown and pink. I really like how the geometric shapes pull this card together. Each circle has some type of embellishment. The upper right corner has a punched Martha Stewart butterfly. Finally, a sentiment from Hero arts finishes off the card. I hope you enjoy!

Wednesday, March 2, 2011

Spring Greetings!


Hello everyone!

Here is a very CAS card today!! I have always wanted to purchase the PTI "Take 3 Spring" stamp set just for the adorable bunny images. Robin was unsure if we would use it very often, so we initially held off. I have to say, having had this set now for over three months, that I really love it! Especially during the cold, snowy winter, making springy cards with bunnies has been a lot of fun. I made this card by stamping the take 3 bunny images onto 3 die cut squares. One thing I really love about this stamp set is the attention to detail in each image. The stitching around the squares really makes the card look quite elegant. I attached the three squares to a strip of PTI Kraft paper. Hope you enjoy!

Monday, February 28, 2011

Cookies!


Every once and while Robin and I talk about the variety of cards that we send to OWH. We try to make sure that each and every box has a nice variety, from 'Happy Birthday' cards to 'thinking of you' or whatever is appropriate for the upcoming holidays. Yet, given the fact that we use mostly PTI stamps, we find that a lot of our cards are more geared to adults. Its not that these cards can't be sent to children but rather that they are just quite sophisticated. Recently we purchased a PTI stamp set designed for kids in an effort to try to make more cards for children. 

I made this card using the Marvy punches that we have. I stamped the image of cookie monster in blue and added a half of an oval for the mouth and two circles for eyes. The cookie was actually made the same way- a large tan circle was embellished with smaller brown circles to look like chocolate chips. A scalloped circle was used to make it look like the cookie had been partially eaten. Finally, I stamped a sentiment from the Hero Arts Monster set. While I love the more sophisticated cards that we make, I do hope to make more cards for children in the future. Hopefully the new PTI stamp set designed for kids will inspire me to do so!

Enjoy!

Friday, February 25, 2011

PTI Blog Hop


Hi!

Today is the 25th, which means that it is a PTI  BlogHop. The theme this month was to use any card with a scallop. Luckily, I bought my first scallop die from PTI this month, and it arrived just in time for me to make a fun card for the hop. I made this card using a new Floral Fusion stamp set at PTI, which I LOVE! I didn't realize how much use we would get out of this stamp and its small matching die. The sentiment also comes from this set. I know I will continue to use this set to make fun, springy cards in the future. Thanks for stopping by. 

If you would like more information about the PTI blog hop, please visit: Nichole's site. 

Happy Birthday!


Just thought I would post a quick card that I made a few weeks ago! To make this card, I used the new present dies that are part of the Make a Wish set from PTI. I cut out both pieces and stamped them in Momento Ink. I love the color combination- rose bud, bahama blue and grape jelly. I taped the cut bow onto the die cut present and then attached them to the background. The textured back was made using an Argyle impression folder. I never realized that a white background on a white card looks really sophisticated. It is something I learned from Nichole Heady and I really love the look. Finally, a small sentiment from Stampin' Up finished the card. 

Hope you enjoy 

Tuesday, February 22, 2011

Happy Birthday!


Good morning!

I am on my way to class but I thought I would drop in and show a fun Birthday card that Robin made for Operation Write Home. This card used the Framed Stamp Set from PTI, which I have used on so many cards! I love how professional it is. I used to attempt to draw the lines by hand, but this stamp makes it so clean and simple. Robin then used the star dies from PTI to die cut three different stars. She filled in the gap in the frame with a small 'celebrate'. Finally, she added a fun sentiment from a birthday set from PTI. This has to be one of my favorite birthday sentiments. I really like the script and the size of it in general. I also like the fact that she used red, white, and blue for the stars on this card. Its a great combination!  

Hope you have a great day!

Sunday, February 20, 2011

Make It Monday #2 Card


Good afternoon!

Just thought I would post a quick card for the Make it Monday Challenge over at PTI. I haven't had much time recently, but I really wanted to give this challenge a try. We have had vellum in the house for the longest time, but we rarely, if ever, use it. I guess I had some type of phobia of smudging the ink after stamping on it. Yet, the amazingly talented Nichole Heady showed how easy it is to create a sentiment strip with vellum. Therefore, I decided to give it one more try. Miraculously, it worked! I love the look of this card. The die is a new Geo Die that Robin found on the Operation Write Home website. It took a little time to get used to it, but I really love the final product. With the chilly weather today, this card is a nice reminder of the springy temperatures soon to come.

Thursday, February 17, 2011

Let it SNOW!


Good morning!


This has to be one of my favorite cards that I made this winter! I don't remember where the idea came from for this card, but I really like how it turned out. I started by stamping the Framed stamp from PTI in black ink on white card stock. I stamped three little snowmen from the Jar Fillers for winter in the middle of the Frame. I took a sentiment from this same set and added it to the opening in the frame. Using basic markers, I colored the snowmen's hat and scarf. I also added some orange for the carrot nose :) I then masked off the frame to add the snowflakes. The snowflakes came from a separate PTI set called Peace Be Still. I stamped them in two different colors of blue around the frame. Finally, I added a colored pearl to the hat on each snowman. I love how the scarf, hat and pom pom all match on each one. They look so cute!

Hope you enjoy!

Monday, February 14, 2011

Happy Valentine's Day


Happy Valentine's Day!


Just thought I would pop in and show you a card that I made for Valentine's day. This card used the Framed set from PTI. I first stamped the frame on a white card base. I then took PTI's Heart Prints stamp set and stamped three small hearts. Recently PTI introduced dies to cut out the hearts that coordinate with this set! I love having the die!! It makes everything look so professional and it makes it easy for us to make multiple cards for OWH at one time. I stamped the three smaller hearts in different colors on the die cut shapes. I then added these with pop up dots to the center of the frame. I stamped the sentiment XOXO from the Heart Prints stamp set, which luckily fit perfectly into the opening in the frame. Finally, I added a small puffy heart sticker that we had left from Valentine's Day cards last year. I really like these little stickers and I hope to be able to get more in the future. 

Hope everyone has a fabulous day today! 

Tuesday, February 8, 2011

Make it Monday: Challenge #1


There is a new challenge every monday at PTI! I think this challenge with the video will be really inspiring each week. This week the challenge was to make a card with multiple sentiments of the same type. I made a few similar cards for this challenge- some with birthday cards and the rest were thank you notes. I really like this technique and I am sure I will use it in the future. Hope you enjoy!

If you want to check out the challenge, visit this link!

Monday, February 7, 2011

PTI Anniversary Day 5


Good Morning!

One of my favorite stamp sets from PTI has got to be Dot Spot. I love the geometric images from this set and I think they look wonderful stamped in different colors. In the past I have always used Dot Spot on a horizontal card, but I decided to try something new this time! I stamped the medium and one of the smaller circles from the set vertically down the card. I also really like this color combination (Raspberry Fizz, plum pudding and Hawaiian Shores) I used the smallest image from the set to add a little bit more to the card. The sentiment comes from Hero Arts. Robin and I use a lot of sentiments like 'thinking of you' or 'Hi There'. These sentiments can really be used for anything, which makes them perfect for OWH. As a final touch, I added some pink rhinestones and purple pearls to the interior of the circles. This really made them pop off the page and I love the final card.

Hope you enjoy!

Tuesday, February 1, 2011

Thank You


Looking back over the cards we have made for Operation Write Home, I have to say that Robin and I have become much more sophisticated in our card making. Perhaps this is because PTI offers very CAS and sophisticated products or perhaps our technique has just improved. I think this card is a fabulous example of this. I got the idea for this card from Nichole Heady, the head of PTI.  I absolutely love her style! She is really an inspiration. 

I LOVE the look of the white embossed background on this card. I think its wonderfully subtle and sophisticated. It is something I never would have thought of trying, but Nichole showed how professional it can make a card look. I ran an impression folder (argyle) through the Cuttlebug and then attached it to a white card base. I then used the new gorgeous Mat Stack 1 stamp set. The sentiment is stamped on a die cut double banner, which is also from PTI :) As a final touch, I added a Scarlet Jewel button to each side of the sentiment. I really think is an elegant card. For me, it proves that often in card making, less is more!

Enjoy!

Tuesday, January 25, 2011

PTI Bloghop


Hey everyone!

PTI Blog Hop Challenge
"With the new year comes a clean slate along with many resolutions. This month's blog hop challenge involves you challenging yourself to use a Papertrey stamp set that has yet to see ink or even one that might be collecting a little dust! Go through your stash and see what little used treasure it might hold."


For this challenge, Robin and I went through our stamp sets to see which sets have never been inked. I was not surprised when we found that all of our PTI sets have been stamped, at least once. We love our PTI sets and we use them a lot! When they come in the mail we are usually so excited that we put them together almost immediately and use them very soon after to make new, and different cards.

Yet, for this challenge, I decided to use a stamp that has never seen ink from a set that we use a lot. Robin uses the Round and Round anniversary set very often. We love stamping the round images and adding rhinestones to embellish them. Yet, there was a large flourish in the stamp set that had never been inked. I never really knew what to do with this stamp; I always looked at it when perusing the set, but never tried it. Well, for this challenge I decided to ink it up! I really like how this card came together. I stamped the new image in pink onto a die cut Mat Stack 1. I then added the butterfly stamp from the same anniversary set. I also cut out white strips and stamped them with the border stamp from the coordinating Mat Stack 1 stamp set. I added a sweet sentiment from the Round and Round anniversary set and placed three small pearls underneath it. I placed all of this on a matching purple background. Overall, I am quite happy with how the card looks. I hope to use this fun flourish stamp that coordinates with all of the circles in the Round and Round anniversary set more often!

Thanks for stopping by!

Tuesday, January 18, 2011

Ladybugs


I vividly remember the moment I received the dreaded e-mail about our lovely local stamp store Scraptasia. The first thing I noticed was the subject on my phone- "Sad News from Scraptasia" I knew right then and there that this amazing store would be closing its doors. The e-mail detailed the store's closing, and the sale to empty the store before closing. On their final day, Scraptasia had a grab bag, where people could stuff a shopping bag with any goodies left in the store for $20.00. After dropping my grandmother off at the airport, Robin and I rushed over to pick up supplies and say our goodbyes. While I always loved the stamps in Scraptasia, Robin seemed to love the various patterned papers. She stocked up on a wide variety of patterned and solid papers this final Saturday morning. As sad as the store's closing was, I do feel good that we are using the products we got for a good cause!

Robin made this card. I really love the patterned paper she used, which came from the sale at Scraptasia. The colors on this paper are fabulous- so bright and cheery! I also really like the way she matched the colors in the patterned paper with the circles around the sentiment. With all of this cold weather and snow, its fun to use light colors and think about spring.

Enjoy!

Friday, January 14, 2011

Thank You


The other day Robin mentioned that we have not made many 'Thank you' cards for Operation Write Home recently. I am always interested in making new and different cards so I decided to try to make some new Thank you notes. I took the Framed set from Papertrey Ink and stamped it in black ink on white card stock. I then took an older PTI set, All About You, and stamped the large 'YOU' in various colors. To get this look, I masked the frame using post-it notes. I then added a small 'thank' stamp from the same set in black. Finally, I added a small Thank you sentiment under the frame with a coordinating small blue flower. I really like how this card turned out! I think I will make some more using different colors.

Thanks for looking. I hope you have a great day!

Wednesday, January 12, 2011

Warm winter wishes!


Hi everyone!

Just thought I would post a card today for all those experiencing a serious dose of "winter weather." NYC is freezing and we are supposed to get a significant amount of snow fall by the end of the day. We're stuck in the house, doing some work and making some cards of course. I never thought we would use the jar stamp set from PTI but it turns out that we actually use it quite a lot. Around Christmas, PTI came out with a winter addition to the Jar Fillers Stamp set. One of the stamps is a handle, that turns the jar into a mug. Topped with some fluffy marshmallows, the hot cocoa looks good enough to drink! I added a small jar label to the mug stamped in black on Kraft paper. A small strip of brown accent paper finishes the card. I also really love the sentiment that goes with the hot cocoa- 'warm winter wishes'. Definitely a perfect sentiment for today!

Hope everyone is staying warm and enjoying the winter weather!

Tuesday, January 11, 2011

Halloween in January???


I know what you are thinking... Halloween is long gone! All of the Halloween supplies should be tucked away in the cabinet, not to be removed until next fall. Well, we took a trip to San Francisco last summer and came home with a stamp set that made it possible to use monsters all year long. Robin will tell you that I have always had a thing for monsters, especially those with only one eye! Therefore, as soon as we walked into a stamp store in SF and saw the Hero Arts Monster Fun stamp set, I knew it was coming home with us. The stamp set has adorable monsters!!  Robin makes many cards with it, coloring them in and adding one of the fun matching sentiments from the set. We also add a googly eyes to finish up the card!

For this card I wanted to use a slightly different monster. Looking back over the year, perhaps one of the best punches we bought was the owl punch from Stampin' Up. Sure, we make a bunch of cards with cute owls sitting on branches. Yet, I was interested in doing something else with this punch. After searching the net, I saw some cards where people turned the owl into various monsters. Paired with a sentiment from the Hero Arts Monster Fun set, the handmade monsters were perfect! Although making these cards is fairly time consuming, it is definitely worth it! You can really be creative and make a monster out of any color or shape of punched paper. I hope you enjoy the card! 

Banners


Hi everyone!

I haven't posted in a long time! I was really busy with school and final exams and therefore did not have much time to blog.  I am on school break now and thought I would post a few cards. While I haven't posted in a while, we have been making roughly 280 cards every other week. A few months ago we got this Banner Builder Set from Papertrey Ink. Although Robin was unsure if we would get enough use out of it, I have been using it a lot and I have come to really like all the different options. This stamp set comes with three different shaped banners and each individual banner has a different pattern. The set also comes with two strings from which to hang the banners. 

For this card, I stamped the vertical string twice. I added the triangular banners in three different colors. I really like the polka dot one! I then added some clouds from the PTI Up Up and Away stamp set. Finally, a sentiment from Up Up and Away finishes the card. We don't often make one layer cards, but I had fun experimenting with it. I think its a really 'springy' and cheery card! I hope you enjoy!